 |
Settings |
MCACC Pro
Operation:
Use the on-screen displays (OSD) that appear on the TV to make the settings.
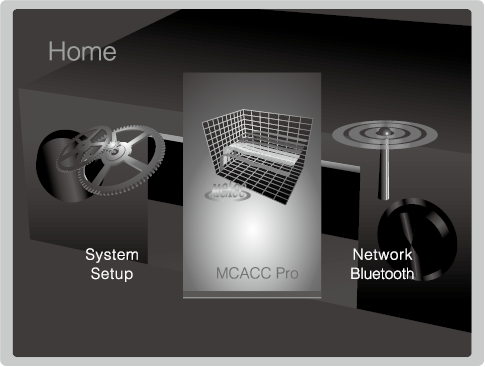
Press  on the remote controller to display the Home screen, then select MCACC Pro with the cursors on the remote controller and press ENTER.
Select the item with the cursor  /
/ /
/ /
/ buttons of the remote controller and press ENTER to confirm your selection.
Use the cursors  /
/ to change the default values.
To return to the previous screen, press  .
.
To exit the settings, press  .
.
Full Auto MCACC
Place the supplied speaker setup microphone in the listening position, measure the test tones emitted by the speakers, then the unit automatically sets the optimum volume level for each speaker, the crossover frequencies, and the distance from the listening position. The influence of standing waves can be reduced to suit the listening environment, the reverberation characteristics can be measured to increase the precision of calibration, the speaker equalizers can be adjusted, and the difference in phase and timing between speakers and speaker units can be corrected. These settings and calibrations can be readjusted with Manual MCACC, and you can enable or disable them in AV Adjust.
Calibration takes between 3 to 12 minutes to be completed. The speakers emit the test tone at high volume during measurement, so be careful of your surroundings. Keep the room as quiet as possible during measurement.
If the power of this unit suddenly turns off, the wires in the speaker cables may have touch the rear panel or other wires and tripped the protection circuit. Twist the wires again properly and make sure they do not stick out of the speaker terminals when connecting.
1.Place the supplied speaker setup microphone in the listening position, and connect to the MCACC SETUP MIC jack on the main unit.
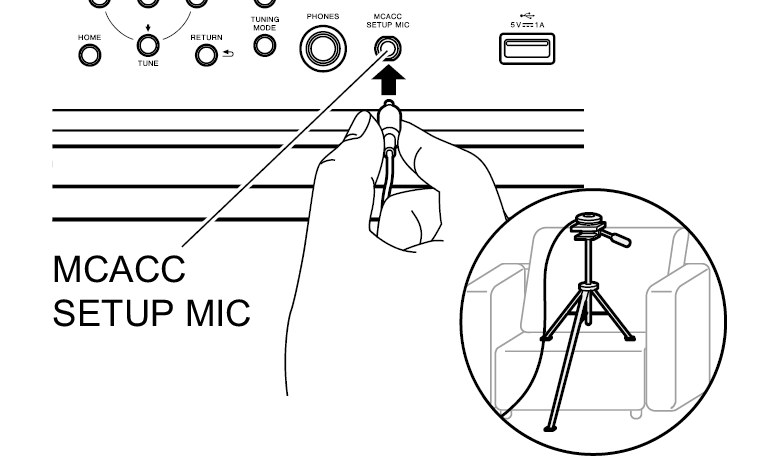
When putting the speaker setup microphone on a tripod, refer to the illustration when putting it in place.
To cancel Full Auto MCACC partway through, disconnect the speaker setup microphone.
2.Select the connected speaker configuration, and select the calibration type for which you want to save the measurement results from amongst "Symmetry", "All Channel Adjust", and "Front Align".
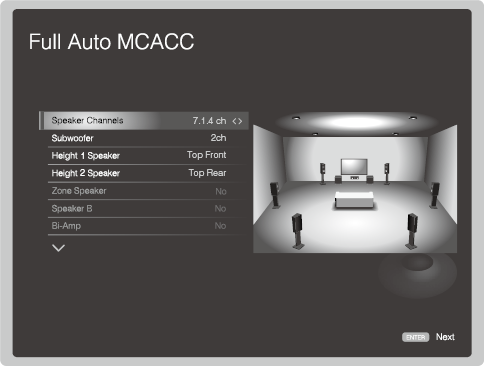
The image on the screen changes as you choose the number of channels in "Speaker Channels", so refer to it when performing the settings.
Use this screen to select whether you have connected a subwoofer and to select the type of height speaker, etc.
If you have connected a subwoofer, check the power and volume of the subwoofer. Set the subwoofer volume to more than halfway.
"Symmetry" is a type of calibration that emphasizes phase characteristics. "All Channel Adjust" emphasizes frequency characteristics. "Front Align" calibrates to emphasize the characteristics of the front speakers. The initial setting is "Symmetry". To save the measurement results of other calibration types, select from "M1.Memory 1" to "M3.Memory 3". If multiple calibration types are selected, you can select the calibration type to use in "AV Adjust" - "MCACC" - "MCACC Memory". Note that you cannot select the same save destination for different calibration types.
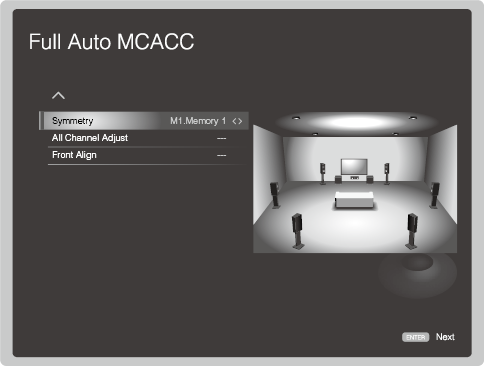
After making the above settings, press ENTER.
3.Test tones are emitted by the speakers, and firstly the unit detects the speakers connected and the noise in the environment.
If "Reverse Phase" is displayed, check whether you have connected the poles of the speakers (+ / –) in reverse. Even if the connections are correct, "Reverse Phase" may be displayed due to the speakers or the environment surrounding the speakers, but this will not affect the calibration so you can proceed to the next step.
4.After the results of the above measurements are displayed, select "Next", press ENTER on the remote controller, and the test tones are emitted again, and the unit automatically makes settings such as the optimum volume level and the crossover frequency.
5.Calibration finishes, so when "Please unplug setup microphone." is displayed, disconnect the speaker setup microphone. You cannot use any menu options other than MCACC Pro while it is connected.
Manual MCACC
When Full Auto MCACC is run, a variety of speaker settings are made automatically, but Manual MCACC enables you to make further adjustments manually, giving you the opportunity to make even more detailed settings.
Before making these adjustments, run Full Auto MCACC first.
Depending on the settings, speakers may emit test tones at high volume during measurement, so be careful of your surroundings.
If multiple settings are saved in the MCACC Memory, press  on the remote controller, and select the MCACC Memory first in "AV Adjust" - "MCACC" - "MCACC Memory".
Fine Channel Level
Adjust the volume level of the speakers while listening to the test tone. After firstly adjusting the Front Left speaker to the desired volume, adjust the volume level so that each channel is the same level, starting from the Front Right speaker. Test tone output alternates between the selected speaker and the benchmark speaker, so adjust the volume so it becomes the same.
Front Left
Default Value: 0.0 dB
Select a value between "-12.0 dB" and "+12.0 dB" (in 0.5 dB increments). A test tone will be output each time you change the value. Select the desired level.
Front Right
Default Value: 0.0 dB
Select a value between "-12.0 dB" and "+12.0 dB" (in 0.5 dB increments). Test tone output alternates between this speaker and the benchmark Front Left speaker, so adjust the volume so it becomes the same.
Center
Default Value: 0.0 dB
Select a value between "-12.0 dB" and "+12.0 dB" (in 0.5 dB increments). Test tone output alternates between this speaker and the benchmark Front Left speaker, so adjust the volume so it becomes the same.
Height 1 Left
Default Value: 0.0 dB
Select a value between "-12.0 dB" and "+12.0 dB" (in 0.5 dB increments). Test tone output alternates between this speaker and the benchmark Front Left speaker, so adjust the volume so it becomes the same.
Height 1 Right
Default Value: 0.0 dB
Select a value between "-12.0 dB" and "+12.0 dB" (in 0.5 dB increments). Test tone output alternates between this speaker and the benchmark Height 1 Left speaker, so adjust the volume so it becomes the same.
Height 2 Left
Default Value: 0.0 dB
Select a value between "-12.0 dB" and "+12.0 dB" (in 0.5 dB increments). Test tone output alternates between this speaker and the benchmark Front Left speaker, so adjust the volume so it becomes the same.
Height 2 Right
Default Value: 0.0 dB
Select a value between "-12.0 dB" and "+12.0 dB" (in 0.5 dB increments). Test tone output alternates between this speaker and the benchmark Height 2 Left speaker, so adjust the volume so it becomes the same.
Surround Left
Default Value: 0.0 dB
Select a value between "-12.0 dB" and "+12.0 dB" (in 0.5 dB increments). Test tone output alternates between this speaker and the benchmark Front Left speaker, so adjust the volume so it becomes the same.
Surround Right
Default Value: 0.0 dB
Select a value between "-12.0 dB" and "+12.0 dB" (in 0.5 dB increments). Test tone output alternates between this speaker and the benchmark Surround Left speaker, so adjust the volume so it becomes the same.
Surr Back Left
Default Value: 0.0 dB
Select a value between "-12.0 dB" and "+12.0 dB" (in 0.5 dB increments). Test tone output alternates between this speaker and the benchmark Surround Left speaker, so adjust the volume so it becomes the same.
Surr Back Right
Default Value: 0.0 dB
Select a value between "-12.0 dB" and "+12.0 dB" (in 0.5 dB increments). Test tone output alternates between this speaker and the benchmark Surround Back Left speaker, so adjust the volume so it becomes the same.
Subwoofer 1
Default Value: 0.0 dB
Select a value between "-15.0 dB" and "+12.0 dB" (in 0.5 dB increments). Test tone output alternates between this speaker and the benchmark Front Left speaker, so adjust the volume so it becomes the same.
Subwoofer 2
Default Value: 0.0 dB
Select a value between "-15.0 dB" and "+12.0 dB" (in 0.5 dB increments). Test tone output alternates between this subwoofer and the benchmark Subwoofer 1, so adjust the volume so it becomes the same.
Fine Speaker Distance
Make fine adjustments to the distance of the speakers from the listening position while listening to the test pulse. After firstly setting the measured distance of the Front Left speaker from the listening position, adjust the distance of the other speakers, starting with the Front Right speaker. The test pulse is output from the selected speaker and the benchmark speaker, so adjust the distance so the point where the test pulse is heard is in the middle of the two speakers.
Front Left
Default Value: 10' 0" / 3.00 m
Set the measured distance of the Front Left speaker from the listening position.
Front Right
Default Value: 10' 0" / 3.00 m
The test pulse is output from this speaker and the benchmark Front Left speaker, so adjust the distance so the point where the test pulse is heard is in the middle of the two speakers.
Center
Default Value: 10' 0" / 3.00 m
The test pulse is output from this speaker and the benchmark Front Left speaker, so adjust the distance so the point where the test pulse is heard is in the middle of the two speakers.
Height 1 Left
Default Value: 10' 0" / 3.00 m
The test pulse is output from this speaker and the benchmark Front Left speaker, so adjust the distance so the point where the test pulse is heard is in the middle of the two speakers.
Height 1 Right
Default Value: 10' 0" / 3.00 m
The test pulse is output from this speaker and the benchmark Height 1 Left speaker, so adjust the distance so the point where the test pulse is heard is in the middle of the two speakers.
Height 2 Left
Default Value: 10' 0" / 3.00 m
The test pulse is output from this speaker and the benchmark Front Left speaker, so adjust the distance so the point where the test pulse is heard is in the middle of the two speakers.
Height 2 Right
Default Value: 10' 0" / 3.00 m
The test pulse is output from this speaker and the benchmark Front Right speaker, so adjust the distance so the point where the test pulse is heard is in the middle of the two speakers.
Surround Left
Default Value: 10' 0" / 3.00 m
The test pulse is output from this speaker and the benchmark Front Left speaker, so adjust the distance so the point where the test pulse is heard is in the middle of the two speakers.
Surround Right
Default Value: 10' 0" / 3.00 m
The test pulse is output from this speaker and the benchmark Front Right speaker, so adjust the distance so the point where the test pulse is heard is in the middle of the two speakers.
Surr Back Left
Default Value: 10' 0" / 3.00 m
The test pulse is output from this speaker and the benchmark Surround Left speaker, so adjust the distance so the point where the test pulse is heard is in the middle of the two speakers.
Surr Back Right
Default Value: 10' 0" / 3.00 m
The test pulse is output from this speaker and the benchmark Surround Right speaker, so adjust the distance so the point where the test pulse is heard is in the middle of the two speakers.
Subwoofer 1
Default Value: 10' 0" / 3.00 m
The test pulse is output from this speaker and the benchmark Front Left speaker, so adjust the distance so the point where the test pulse is heard is in the middle of the two speakers.
Subwoofer 2
Default Value: 10' 0" / 3.00 m
The test pulse is output from this speaker and the benchmark Subwoofer 1, so adjust the distance so the point where the test pulse is heard is in the middle of the two speakers.
Default values vary depending on the regions.
Distance units can be switched by pressing MODE on the remote controller. When the unit is set as feet, you can set between 0' 0" 1/2 and 30' 0" in increments of 1/2. When the unit is set as meters, you can set between 0.01 m and 9.00 m in increments of 0.01 m.
Standing Wave
This controls the affect of the standing waves that occur when sound waves reverberating off obstacles such as walls interfere with the original sound waves.
Main
Default Value: 0.0dB
Center
Default Value: 0.0dB
Subwoofer
Default Value: 0.0dB
EQ Adjust
You can adjust the output volume of the range of each speaker while listening to test noises. You can adjust the volume of the different sound ranges for each of the speakers. You can select up to four bands for the Subwoofer and nine bands for all other speakers. If the overall volume balance changes by adjusting the volume of each frequency, you can readjust the balance in "Trim".
Front Left
Default Value: 0 dB
Center
Default Value: 0 dB
Front Right
Default Value: 0 dB
Height 1 Left
Default Value: 0 dB
Height 1 Right
Default Value: 0 dB
Height 2 Left
Default Value: 0 dB
Height 2 Right
Default Value: 0 dB
Surround Right
Default Value: 0 dB
Surr Back Right
Default Value: 0 dB
Surr Back Left
Default Value: 0 dB
Surround Left
Default Value: 0 dB
Subwoofer 1
Default Value: 0 dB
Subwoofer 2
Default Value: 0 dB
The result may not be as expected depending on the input source and listening mode setting.
EQ Professional
You can automatically measure and calibrate the reverberation characteristics (how the sound echoes) of the room. First measure the reverberations with "Reverb Measurement", then check the results with "Reverb View". Specify the calibrated time position in "Advanced EQ Setup" based on the measured results to automatically calibrate the reverberation characteristics.
Reverb Measurement :
Measure the reverberation characteristics of the room. After making the following settings, place the speaker setup microphone in the listening position, and connect to the MCACC SETUP MIC jack on the main unit. Press ENTER and follow the on screen instructions.
Reverb Measure
Default Value: without EQ
Select the method for measuring the reverberation characteristics.
"without EQ": MCACC is used to measure the reverberation characteristics of the room without any adjustments made to the equalizer of the speakers.
"with EQ": Measures the reverberation characteristics of the room using the adjustments to the equalizer of the speakers saved in the MCACC Memory.
Reverb View :
The results of the measurements of the reverberation characteristics are shown in graphs for each speaker and frequency. If there is no reverberation, the graph stays horizontal, but if there is reverberation the graph rises to the right. If the "Symmetry" calibration type has been selected and Full Auto MCACC was performed, predicted values for the reverberation characteristics after calibration are also shown.
Advanced EQ Setup :
Reverberation characteristics are automatically calibrated according to the settings made.After making the following settings, place the speaker setup microphone in the listening position, and connect to the MCACC SETUP MIC jack on the main unit. Press ENTER and follow the on screen instructions.
Time Position
Default Value: 30 - 50 msec
Specify the calibrated time position in the range between "0 - 20 msec" and "60 - 80 msec" (10 msec intervals).
If the reverberation characteristics differ for each frequency or each channel in the Reverb View graph, we recommend selecting "30 - 50 msec". If the overall reverberation characteristics are similar, we recommend selecting "60 - 80 msec".
EQ Type
Default Value: Symmetry
Select the calibration type.
"Symmetry": Speakers that make one set as a left and right pair have their frequency characteristics calibrated flatly. Speakers not in pairs, such as the center speaker, are adjusted individually. Select when you want to give weight to phase characteristics for calibration.
"All Channel Adjust": Flatly calibrates individually the frequency characteristics of all speakers. Select when you want to give weight to frequency characteristics for calibration.
"Front Align": Calibrates speakers other than the front speakers so their characteristics match those of the front speakers (front speakers are not calibrated). Select when you want to give weight to characteristics of the front speakers for calibration.
Standing Wave Multi Position
Default Value: No
When you select "Yes", standing wave calibration can be performed at two listening positions along with the main listening position. If there is only one listening position, select "No".
If you select "Yes", calibration is first performed for the locations other than the main position, then the main position is calibrated last.
Precision Distance
With the distance of the Front Left speaker from the listening position as the standard, adjust the position of each speaker with a precision up to the closest 1 cm. Adjust the distance in order starting at the Front Right speaker. Test tone output alternates between the selected speaker and the speaker that is used as its benchmark. First setup the speaker setup microphone in the listening position and connect it to the MCACC SETUP MIC jack on the main unit, then select this setting.
Front Right
Default Value: -
Move the speakers back and forth about a centimeter at a time in relation to the speaker setup microphone so that "Score" becomes "10.0" If the number does not become "10.0", put the speaker in the position where the maximum value is achieved.
Do not move the Front Left speaker, upon which calibration is based, during the adjustments.
Center
Default Value: -
Move the speakers back and forth about a centimeter at a time in relation to the speaker setup microphone so that "Score" becomes "10.0" If the number does not become "10.0", put the speaker in the position where the maximum value is achieved.
Do not move the Front Left speaker, upon which calibration is based, during the adjustments.
Height 1 Left
Default Value: -
Move the speakers back and forth about a centimeter at a time in relation to the speaker setup microphone so that "Score" becomes "10.0" If the number does not become "10.0", put the speaker in the position where the maximum value is achieved.
Do not move the Front Left speaker, upon which calibration is based, during the adjustments.
Height 1 Right
Default Value: -
Move the speakers back and forth about a centimeter at a time in relation to the speaker setup microphone so that "Score" becomes "10.0" If the number does not become "10.0", put the speaker in the position where the maximum value is achieved.
Do not move the Height 1 Left speaker, upon which calibration is based, during the adjustments.
Height 2 Left
Default Value: -
Move the speakers back and forth about a centimeter at a time in relation to the speaker setup microphone so that "Score" becomes "10.0" If the number does not become "10.0", put the speaker in the position where the maximum value is achieved.
Do not move the Front Left speaker, upon which calibration is based, during the adjustments.
Height 2 Right
Default Value: -
Move the speakers back and forth about a centimeter at a time in relation to the speaker setup microphone so that "Score" becomes "10.0" If the number does not become "10.0", put the speaker in the position where the maximum value is achieved.
Do not move the Front Right speaker, upon which calibration is based, during the adjustments.
Surround Left
Default Value: -
Move the speakers back and forth about a centimeter at a time in relation to the speaker setup microphone so that "Score" becomes "10.0" If the number does not become "10.0", put the speaker in the position where the maximum value is achieved.
Do not move the Front Left speaker, upon which calibration is based, during the adjustments.
Surround Right
Default Value: -
Move the speakers back and forth about a centimeter at a time in relation to the speaker setup microphone so that "Score" becomes "10.0" If the number does not become "10.0", put the speaker in the position where the maximum value is achieved.
Do not move the Front Right speaker, upon which calibration is based, during the adjustments.
Surr Back Left
Default Value: -
Move the speakers back and forth about a centimeter at a time in relation to the speaker setup microphone so that "Score" becomes "10.0" If the number does not become "10.0", put the speaker in the position where the maximum value is achieved.
Do not move the Surround Left speaker, upon which calibration is based, during the adjustments.
Surr Back Right
Default Value: -
Move the speakers back and forth about a centimeter at a time in relation to the speaker setup microphone so that "Score" becomes "10.0" If the number does not become "10.0", put the speaker in the position where the maximum value is achieved.
Do not move the Surround Right speaker, upon which calibration is based, during the adjustments.
MCACC Data Check
You can check the number of speaker channels connected and the content and values you have set for each of the speaker settings. Depending on the item, you can check by changing the MCACC memory or Channel with the cursors.
Speaker Setting
You can check the number of speaker channels connected and the large and small settings you have set for the low range reproduction capabilities for each of the speakers.
Channel Level
You can check the output level settings for each of the speakers.
Speaker Distance
You can check the distance from each speaker to the listening position.
Standing Wave
You can check the settings of the standing wave control filter.
Acoustic Calibration EQ
You can check the calibration values for the frequency characteristics of each speaker that were set in "Manual MCACC".
Group Delay
You can check the group delay of speakers before and after calibration.
Data Management
You can change the name of the MCACC Memory, or copy or delete the settings you have made.
Memory Rename
Change the name of the MCACC Memory.
M1
Default Value: Memory 1
You can select a name for the memory from "Memory 1", "Symmetry", "All Adj", "F.Align", "Movie", "Music", "Game", "Party", "Sofa", and "Seat".
M2
Default Value: Memory 2
You can select a name for the memory from "Memory 2", "Symmetry", "All Adj", "F.Align", "Movie", "Music", "Game", "Party", "Sofa", and "Seat".
M3
Default Value: Memory 3
You can select a name for the memory from "Memory 3", "Symmetry", "All Adj", "F.Align", "Movie", "Music", "Game", "Party", "Sofa", and "Seat".
MCACC Memory Copy
Copy the speaker settings from a Memory to another Memory. After making the following settings, press ENTER and follow the on screen instructions.
Copy
Default Value: All Data
Select the content you want to copy.
"All Data": Copy all settings.
"Level & Distance": Copy only the output level and distance from the listening position for each speaker.
Copy from
Default Value: M1.Memory 1
Select the Memory you want to copy.
Copy to
Default Value: M1.Memory 1
Select the Memory you want to copy to.
MCACC Memory Clear
Delete the speaker settings from a Memory. After selecting the memory, press ENTER and follow the on screen instructions.
SN 29402620HTML
(C) Copyright 2016 Onkyo & Pioneer Corporation Japan. All rights reserved.
